In order to connect the iCG QuickBooks plugin to your iCheckGateway account, you will need to first enter the live credentials and other config settings.
In the Company menu, select iCheckGateway.com > Settings

Enter the live credentials and other config settings
It is important that you keep the Site Key and API Key credentials confidential for security. You do not want to send them through regular email. By sending them in regular email, you run the risk of someone intercepting this information and then using it for fraudulent purposes.
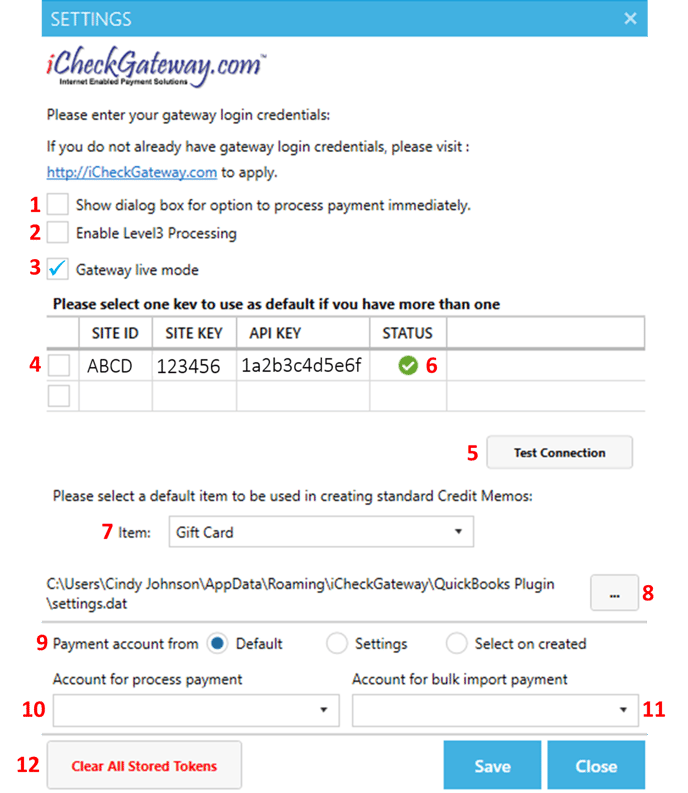
- Show dialog box for option to process payment immediately - You have the option for the iCG QuickBooks plugin to prompt you to process a payment immediately after you have created a new invoice in QuickBooks. This is beneficial for merchants who create an invoice and wish to go ahead and process the payment on the customer's behalf at that time. If you do not want to be prompted each time, do not check this box.
- Enable Level3 Processing - This setting will only apply to merchants whose iCG accounts have been set up to qualify for Level 3 credit card processing rates. If you are unsure if this applies to your merchant account, please contact your sales rep or our Support Team.
- Gateway Live Mode - This box must be checked in order for you to be able to process live transactions.
- Live Credentials - The live credentials for your account will be provided to you by iCheckGateway. Enter the Site ID, Site Key, and API Key. If you have more than one iCG account, you will need to enter the credentials that correspond to each account and select the one that should be used as the default account.
- Test Connection - Click the test connection button to confirm the connection is working correctly.
- Status - You should see a green checkmark to indicate a successful connection. If the connection fails and you see a red "x", you will want to confirm that you have entered the credentials correctly. Please note, these credentials are case-sensitive.
- Credit Memo - You are required to select a default item to be used in creating a standard credit memo. The options for this dropdown menu are managed in QuickBooks under your lists. The credit memo item can always be changed in the future, but a default needs to be entered here at this time to allow you to continue the settings process.
- Path to Shared Folder - If you have multiple computers accessing the same QuickBooks company file, you have the option to store data in the shared file and make it available to all computers. Add the path to the company files shared folder here.
- Payment Account from - If Default is selected, then the bank account that was most recently accessed in QuickBooks will be used for the account where the payments will post when imported. If you would like to select the specific bank account for the plugin to use for every transactions, select Settings. If you would like the plugin to prompt you for the bank account with each transaction, choose Select on created.
- Account for Process Payment - If you chose Settings, choose the bank account that the plugin should use for every transaction.
- Account for Bulk Import Payment - If you chose Select on created, choose the bank account that the plugin should use for bulk invoice processing.
- Clear All Stored Tokens - Removes all stored payment methods.
After the settings have been entered, click Save and Close